Master the Art of the Perfect Fried Egg at Home
If the thought of replicating that diner-style fried egg, with its glistening yolk and perfectly set, flat white, feels like a culinary challenge, prepare to have your misconceptions shattered. Mastering
how to fry an egg is not just for professional short-order cooks; it’s an accessible skill that anyone can conquer with a few simple tips and a dash of patience. Forget rubbery whites and burnt edges – we're about to dive into the secrets of creating a truly sublime fried egg, whether you crave a classic sunny-side-up or prefer your yolks a little firmer.
A perfectly fried egg is more than just a breakfast item; it's a versatile building block for countless meals, from topping an avocado toast to enhancing a bowl of ramen or simply taking center stage on your breakfast plate. This comprehensive guide will walk you through the precise steps to achieve your ideal fried egg, ensuring every bite is a testament to simple perfection.
The Diner-Style Sunny Side Up: A Masterclass in Perfection
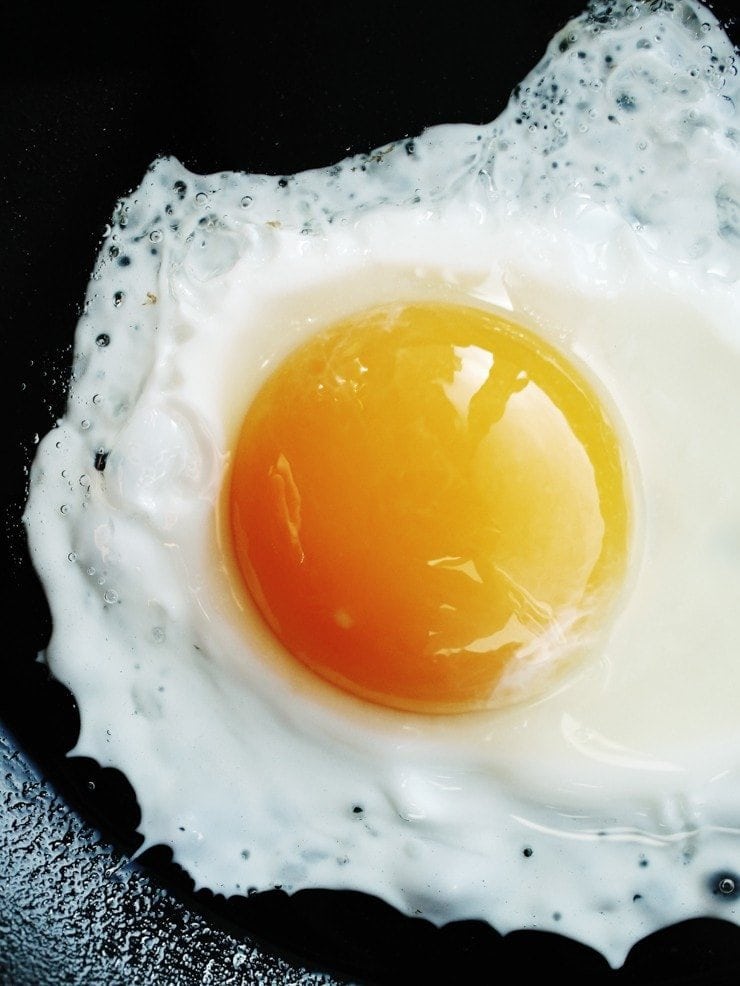
The quintessential sunny-side-up egg is a thing of beauty: a completely set, yet tender white, encircling a vibrant, liquid yolk. Achieving this requires precision, especially in temperature management and preparation.
Preparation is Paramount: Cracking and Pan Setup
Before your egg even touches the pan, a little preparation goes a long way. Start by adding approximately 1 teaspoon of unsalted butter (or your preferred cooking oil) to a small nonstick pan. Place the pan over medium heat. While the butter is gently melting, crack your egg into a small, separate bowl. A pinch bowl or even a plastic condiment ramekin works perfectly.
Why this extra step? Cracking the egg into a bowl first serves a couple of crucial purposes. Firstly, it allows you to easily spot and remove any rogue bits of eggshell that might have fallen in, saving you the unpleasant surprise later. Secondly, and perhaps most importantly for presentation, pouring the egg gently from a bowl significantly reduces the risk of breaking the delicate yolk. It also gives you more control, enabling you to guide the egg into a more desirable, rounded shape in the pan, rather than having it spread out haphazardly. This careful handling is a secret weapon in achieving that coveted diner aesthetic.
The Perfect Pour and Initial Cook
Once your butter has fully melted and just begun to foam slightly – a visual cue that it’s at the ideal temperature – give the pan a gentle swirl to ensure the bottom is evenly coated. Now, delicately pour your pre-cracked egg into the very center of the pan. The moment the egg hits the heat, season it immediately with a small pinch of salt. Then, crucially, reduce the heat to medium-low. This immediate temperature adjustment prevents the edges from crisping too quickly while allowing the white to set gradually.
Achieving the Signature Flat White (Highly Recommended)
For that iconic diner-style fried egg with a flat, even white, there's an optional, yet highly recommended, technique. Once the egg is in the pan and the heat is reduced, take a fork and gently poke at the thicker, higher-sitting parts of the egg white, especially where it meets the thinner, flatter areas. The goal here is to encourage the entire egg white to spread out and sit as flat and evenly as possible. This ensures uniform cooking and avoids those undesirable thick, uneven pockets of white. This subtle manipulation significantly contributes to the overall aesthetic and texture.
Cooking Sunny Side Up to Perfection
Continue to cook the egg until the top of the white is set, but the yolk remains beautifully runny, which typically takes about 3 minutes. Throughout this period, vigilant temperature monitoring is key. If the heat is too high, you risk the whites becoming overly crispy and the yolk developing unsightly bubbles. Conversely, if the heat is too low, the egg will simply languish without cooking properly. Trust your ears: the pan should emit a consistent, gentle sizzle – your auditory guide to ideal cooking conditions.
Should you notice that the very top layer of the white still has a translucent, slightly slimy appearance after 3 minutes, you have two excellent options. You can add a tiny bit more butter to the pan, let it melt, and then gently spoon it over just the uncooked white until it sets. Alternatively, for a quick fix, add about 1 teaspoon of water to the pan and immediately cover it with a lid for approximately 15 seconds. This creates a steamy environment that quickly sets the top of the white. Be aware, however, that steaming can sometimes create a slight cloudy film over the yolk, potentially detracting from its bright, gleaming yellow appearance. For more detailed tips on achieving perfect runny yolks and flat whites, check out our guide on
Fry Eggs Like a Pro: Get Perfect Runny Yolks & Flat Whites.
Beyond Sunny Side Up: Exploring Other Fried Egg Styles
While the sunny-side-up holds a special place, the beauty of learning
how to fry an egg lies in its versatility. Once you've mastered the initial steps, adapting to other preferences is straightforward.
*
Over-Easy: For those who love a runny yolk but prefer the top of the white fully cooked and without translucency, the over-easy egg is your go-to. Follow the initial steps until the egg is in the pan and the top is no longer runny but not yet fully set (usually 1 to 2 minutes). Using a heat-resistant plastic spatula, carefully slide it under the egg and swiftly flip it. Cook for just another 30 seconds to 1 minute on the second side, ensuring the yolk remains very soft and runny.
*
Over-Medium: If you prefer a yolk that's jammy and slightly firmer around the edges but still soft in the center, aim for over-medium. Follow the over-easy flipping steps, but cook the second side for 1 to 1.5 minutes. The yolk will be partially set, offering a delightful creamy texture.
*
Over-Hard: For a completely cooked through, firm yolk, the over-hard egg is the answer. After flipping, cook the second side for 2 to 3 minutes, or until the yolk is firm to the touch. Sometimes, a gentle press with the back of your spatula helps ensure even cooking through the yolk.
To deepen your understanding of these various styles and perfect your technique for each, consult our
Beginner's Guide to Fried Eggs: Sunny Side Up to Over Hard.
Essential Tips for Frying Eggs Like a Pro
Elevating your fried egg game involves more than just following steps; it’s about understanding the nuances that contribute to truly exceptional results.
*
Quality Ingredients Matter: Start with fresh, high-quality eggs. Fresher eggs tend to have thicker whites that hold their shape better, resulting in a more compact and appealing fried egg. The fat you use also makes a difference. Butter imparts a rich, nutty flavor, while a neutral oil like canola or vegetable oil will result in crispier edges. For a delicate flavor and higher smoke point, clarified butter (ghee) is an excellent choice.
*
The Right Pan is Your Ally: A small (6-8 inch) nonstick pan is ideal for a single egg, offering optimal control and preventing sticking. While nonstick is easiest, a well-seasoned cast-iron skillet can also produce fantastic results, especially if you enjoy a slightly crispier edge to your whites.
*
Mastering Temperature Control: This cannot be stressed enough. Consistent, moderate heat is the cornerstone of a perfectly fried egg. High heat leads to burnt edges and uncooked centers, while low heat yields a greasy, rubbery egg. Aim for that gentle sizzle you can hear and see – it’s your best indicator.
*
Seasoning Beyond Salt: While salt is essential for enhancing flavor, don't stop there. A crack of fresh black pepper adds a subtle kick. A tiny sprinkle of smoked paprika can introduce a beautiful color and smoky depth. Experiment with chili flakes or a sprinkle of fresh herbs like chives or parsley for a gourmet touch. Seasoning right after the egg hits the pan ensures the flavors meld as it cooks.
*
Serving with Style: A perfectly fried egg is a culinary chameleon. Serve it simply with toast, nestled atop creamy avocado toast, beside crispy bacon or sausage, or even as a decadent topping for fried rice, noodle dishes, or a hearty salad. Its versatility makes it a go-to for breakfast, lunch, or dinner.
Conclusion
The journey to master
how to fry an egg is a rewarding one, transforming a humble ingredient into a culinary masterpiece. By focusing on meticulous preparation, precise heat control, and a few simple techniques, you can consistently achieve diner-quality results right in your own kitchen. Whether your preference leans towards the luscious runny yolk of a sunny-side-up or the fully set comfort of an over-hard, the power to create your perfect fried egg is now firmly in your hands. Practice these tips, experiment with different styles, and get ready to elevate your meals with this timeless breakfast staple. Happy frying!